Natsterrr's iO

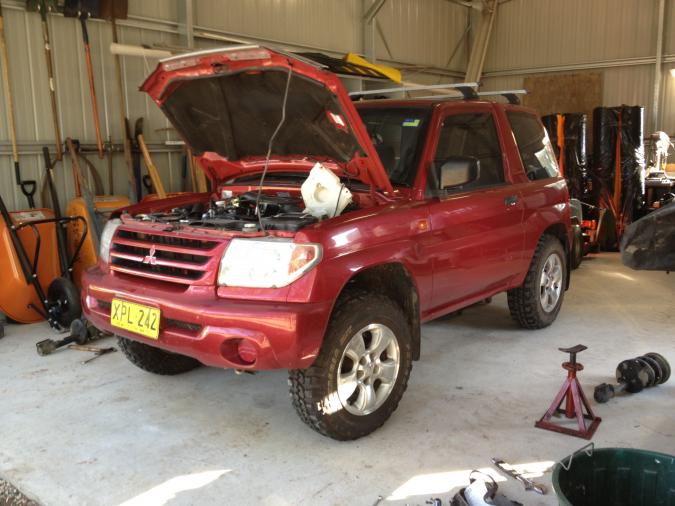
Here is my 2001 QA iO 2.0.

LOVES the beach :)

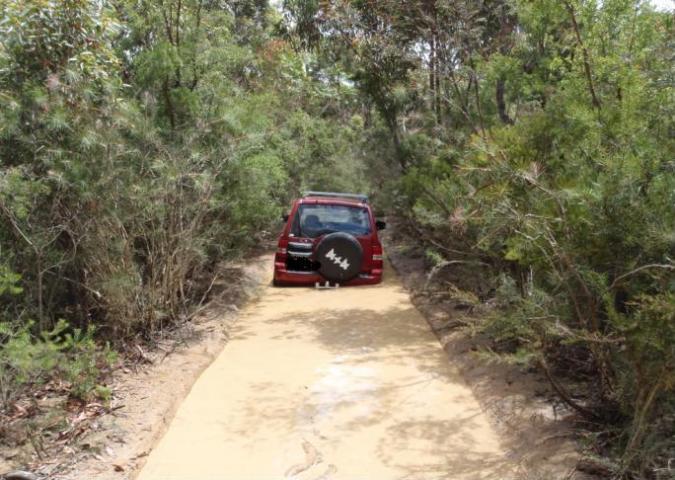
Easy river crossing

Harder river crossing

I made a T-Piece to fit onto my bike rack for my canoe to sit on top. It drives quite well at around 90km/h on long trips with little to no affect on fuel consumption.

Could do with a locker for situations like this, but with a slight change in line selection I drove straight up.
This is my first 4wd - I chose the iO because I wanted something small and comfortable to drive, but definitely had to have 2 gear levers. The Vitara was an option, but I prefer the look of the iO, and as has been said on here before, I like the challenge of customising a rarer vehicle. I'm so glad I found this forum!
My mate drives a '94 Disco, and he has enjoyed taking me on some trails trying to find the limits of the little beast, but has been genuinely impressed with what I've been able to do in it. He's now the one G'ing me up to make changes and see how far I can really drive this thing!
Main drawbacks are obviously ground clearance, lack of parts, and fuel range. The SWB especially has absolutely no room for a larger fuel tank, and with a less than 400km range I'm hesitant for bigger trips. I've been advised against spare wheel mounted jerry cans. I've also read horror stories about jerry cans on roof racks which have leaked! Any suggestions on this would be appreciated.
On an early outing I managed to get bogged in a puddle which had some deep ruts. Being a newbie, I tried to get myself out and got myself bogged even deeper. I had water in the car up to the clutch/brake pedals, and this managed to short out my 4WD indicator ECU.
Doesn't look so bad, right? A lot of damage can happen in a 'little' puddle like this!
I RECOMMEND EVERYONE WHO TAKES THEIR iO NEAR WATER MOVE THIS ECU! As you can see in the pics, the ECU sits right on the floor below the driver's seat. My quick fix was to cut a small hole in the carpet and run the cable through and reconnect the ECU, cable-tied through some small holes drilled into the centre console. As you can see, the unit is now above the transmission tunnel which would allow far more water to enter the vehicle before it shorts out. After I was out of the bog and back on the road, I put the car back into 2H, but noted that the dash light for the centre diff lock was still flashing and my steering was very heavy. The NRMA guy (well, 2 NRMA guys - the first had no idea what an iO was) came and swapped some vacuum hoses over to disengage the centre diff lock, but then I drove home with the dash light flashing.
Once home I took the ECU out, and let it dry (along with all the carpet! :P). Once dry, I took it apart and used a dry toothbrush to brush away the mud crust on all the components. I researched this a fair bit at the time (thanks Bob_Oz for the manual on CD!), and I'm pretty sure the ECU is the same as the one in pajero's and Delica's from the same era, though theirs are mounted behind the radio in the dashboard - Thanks mr Mitsubishi for putting ours on the floor! Luckily for me, when I put mine back into the car and fixed the vacuum lines, everything worked again, so at least they build these electrical bits tough :)

Before - the white box is very susceptible to water here

After - Still not that high, but high enough to survive my earlier encounter.
Mods:
- so far I've added the pro-rack P-bars (they were on special);
- the tow bar which was $340 from Carasel in moorebank (sydney). I could have waited 6 weeks and paid $520 for a Hayman Reese unit from TJM at Carlton (Sydney), but I needed it sooner. I'm still thinking about getting a HR one eventually, as that one is a proper hitch type, while the Carasel one is just a gooseneck;
- Bike rack with Canoe rack extension;
- I've had my driving lights/mount stolen.
Future mods:
- Underbody protection - The stock bash plate has taken a beating and done a good job of protecting, but I'd like something a bit more solid, and some protection for the back end of the transfer case (if I see big rocks on the track ahead I make sure I put them under the passenger side and not my side).
- bigger tyres - I don't want to go overboard, something around 29" would be a good start on standard rims. My main goal in the short term is a trip to Fraser Island. I've been there on a bike and I have seen the ruts in the sand tracks throughout the island. I think tyres and bashplate would be first step to avoid sandblasting through to the carpet inside! For spare rims, I've read somewhere that some Magna rims will fit. These would be easier to source than iO ones, and maybe even available in 7" wide.
- slight lift - I want to stay legal and insurable, but I've been quite confused by all the forum posts on this. Suspension Stuff sell the dobinson's and the KYB's, but if the KYB's are the same as standard, then will I just need the springs? I would like to have plenty of down travel, but do the KYB's offer this? If I was to put in the Dobinson's, should I add wheel spacers to increase the track? And will this chew through my wheel bearings?
- Snorkel and diff breathers
- Maybe a locker? Does anyone know if there are LSD's that would fit? I'm fairly new to 4WDing in general, but lockers and compressors sound a bit too full on ($$$) for me at this point, although I have seen occasions where they would be handy to have...
- Bull bar if I win lotto. Dolan have said they can make one for me (2-3 week turnaround) for $1560 powdercoated Al, or $1765 polished Al. Check it out here: http://www.dolan.com.au/index.php/Pajero-IO/03/99-12/02-Bull-Bar/flypage...
Apologies for the lengthy post, and all the questions, but any help would be appreciated.
Hopefully with forums like this one we can get some outings or trips planned in the future. And possibly some aftermarket manufacturers might take notice of who's buying used iO's and make some parts available!

welcome
The Dolan bullbar is freaken ugly, if i lived in Aus and saw that fitted on a IO i would bow my head in shame. ![]() Not to blow the RSA horn but go have a look at my page where I showcase my IO, not thats a bull bar. LOL On that post you'll be able to see what is the difference between the std KYB & lifted one.
Not to blow the RSA horn but go have a look at my page where I showcase my IO, not thats a bull bar. LOL On that post you'll be able to see what is the difference between the std KYB & lifted one.
Welcome to the forum, love to see a man that wants to work on his IO himself. ![]()
Update
I finally got around to making my bash plate today. 3mm galvanised steel plate. It will be painted black soon.
Old:

New:

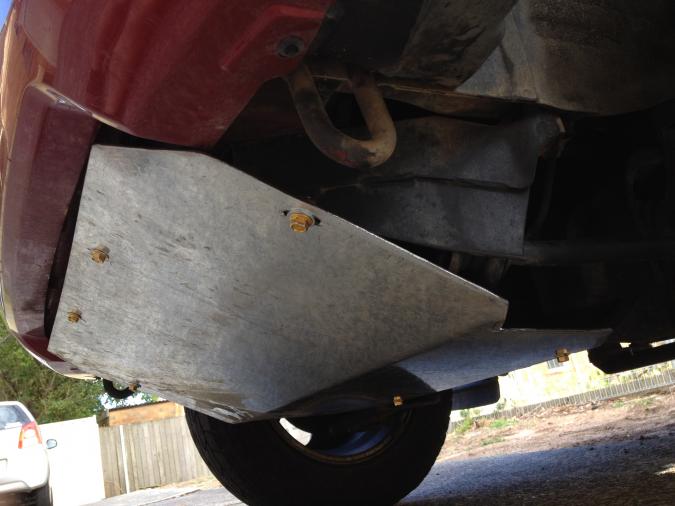
I was in a bit of a rush with the placement of the holes, so the elongations aren't the best job, but I'm happy with it.
And here are my wheels and tyres just to show what my iO looks like when I go off road:

Mazda tribute 16"x7" wheels with Federal Couragia M/T in 205/80R16. Fits straight onto the 2001 2.0 iO without mods or scrubbing.


federal
Looks good, my bash plate looks like yours, yes the old one:) I have to get my underbody protection done as well, I am thinking 6 mm alu plate instead, are you going to put one to protect the transfer case?
How are these tyres do? Any good on the sand?.
Hide that number plate...:)
Happy io
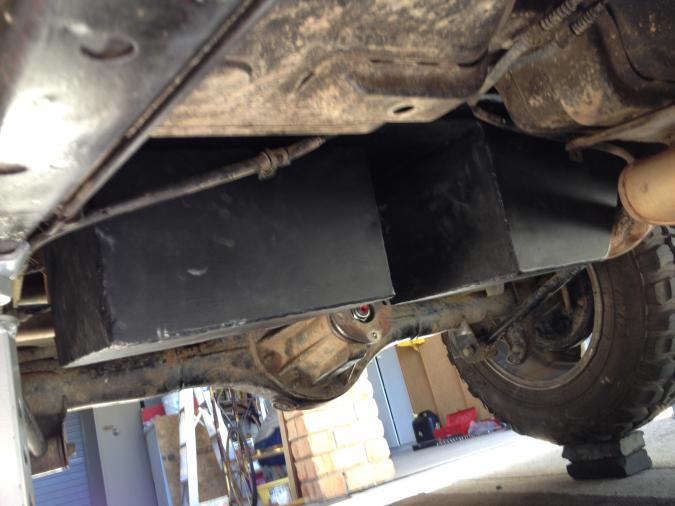
Rear bash plate
I made this one using the 3mm steel plate because I got it for free :)
The offcut that I have is just big enough to make a little cover for the transfer case, which will be this afternoon's job if I get a chance. I'll definitely post some pics of that one. The sump guard above is pretty standard, I based it on a few others I'd seen on here - pretty much just traced around the original one.
The federals have been great - absolutely not problems on fraser island at 14psi. I was worried that they would dig in, but 1st gear low range taking off in deep soft sand was no challenge at all.
Since then I've only done one trip in the blue mountains, and very little actual 4wding to get to our camp spot. I didn't air down, but I selected low range 1st to get up a small rough climb out of our camp, and there was no wheel spin at all. I'm really looking forward to getting out to some tracks with less air in the muddies and see what they are capable of.
bash plate...
Thanks,
Cheap and effective, way to go... It is good to know for the sand, that was one of my "worries" as you I thought that they would dig in...
I have done a bit more 4x4 with my muddies, and they are great, I use a track quiet often (yes, to go fishing!) and I have done it during the week-end with some friends. Only one problem, no more challenge, with the little lift and the extra grip the fun is gone, too easy! This said, I prefer it that way, a bit of challenge is good, but being stack with no one around to help can be painful.
Happy io.
Transfer case cover
I spent most of today fiddling with this. It should work, but looks pretty dodgy...
There was nothing at the rear to bolt the plate to, so I had to make a bit of a hanger to come across from the chassis rail (I bolted it to a threaded insert which was already in the chassis). The bracket is pretty crude, but unfortunately I don't have laser cutting facilities at hand! The brake lines are the biggest problem - I had to make the angle support removable so that the whole bracket can be installed around the brake lines. Hopefully the pics will make sense:

Back -----------------------------------------------------------------------------------------------------------------Front

With brackets on front and back - the front clamps around the transfer case hanger cross bar thingo.

Front mount

Rear bracket bolted to chassis with brake lines running through - I will put some washers and a longer bolt in to the brake line guides to pull it away from the chassis and bracket a little bit when I install it properly.

Its difficult to capture on an iphone (and without a hoist!), but there is about 15-20mm clearance at the bottom and the rear of the transfer case. The plate is roughly flat coming back from the cross member thingo, so ground clearance is pretty close to what is always was. Once I get it all installed I'll probably use a trolley jack under the plate to try and lift the car and see how sturdy this thing is (whether or not I need to strengthen the bracket).
It'll be a good stone guard at the very least :P


hey mate. how much did the
hey mate. how much did the federlas cost? i'm seriouslu looking at getting some. i would prefer an A/T tyre but have read that the couragia M/T is very good in all situations, what are your thoughts. i am particularly concerned about their on-road capabilites, hence why i was lookng at an A/T over M/T...
I'm a fan
I'm really happy with them.
They were $195 each from Tyre Plus (list price was $235, but they did a good deal cos I bought 5).
They are a bit noisy on the road, they increase fuel consumption marginally (I think I calculated about 4% on highway), the speedo is out by about 6% compared to standard, though as far as I can tell the standard tyres were under, putting these ones only *slightly* over on the speedo (from an iphone GPS speedo app).
The first couple of weeks I was really careful with them on wet roads, but as they 'bedded in' they are really good in all conditions on the road. I currently have my old Bridgestone A/T's on, which are on their last legs as far as tread goes. I would say the muddies probably offer better grip at this stage on the road in wet or dry. I'm currently driving over 100km a day on the highway for work, so I'll stick with the old A/Ts until my next trip off road.
Suspension
After trying to save up to do a Koni conversion for the past year, I've finally got to the stage where I need to replace my shocks and the quickest and easiest way is to go with the KYB's.
I ordered a full set from Cars R Us for $521AU and they arrived a couple of days later.
I have had some mazda astina springs sitting in my garage for over a year waiting for me to install them, and more recently I aquired some 1999 SWB front struts and springs (lower spring plate). The free length of these springs is 365 and 370mm, which is a little shorter than the LWB which I initially wanted.
In theory I should get 40mm lift in the rear and 20mm in the front, so with some help from Claude, I made some 20mm spacers from Acetal Copolymer. I had some spare time and a metal lathe at work, so I designed them to fit snugly on the strut top (78 degree taper inside), and included a small raised part at the top to lock into the chassis a little bit. The only thing was that I couldn't tell how big the hole was - I think NZIO said you could weld 80mm pipe into the top of his steel spacers, but from my measurements (taken with the strut still in, so not 100% accurate), the main hole is around 76mm. I ended up turning it down to 75mm just to be sure it would fit. Maybe that will make it completely useless, but oh well, it was worth a try.
I'll be installing all this stuff this week sometime, I'll report back how I go.
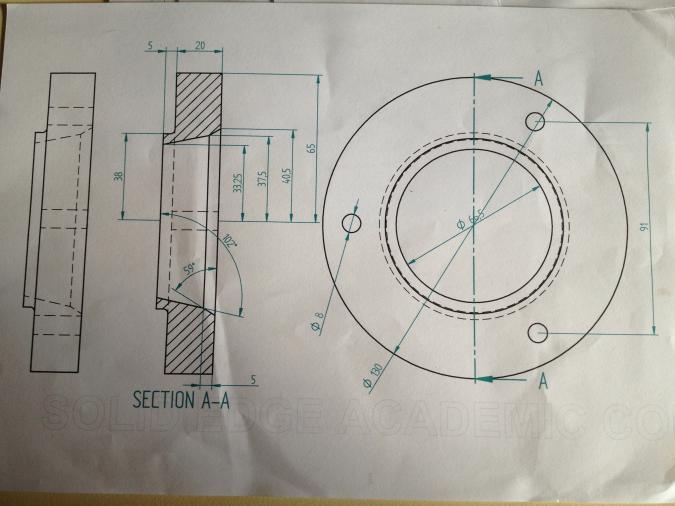
My working drawings. I did all work by hand, so this may not be 100% how they turned out. I used the strut top to check for a snug/flush fit while still on the lathe.
![]()
Should look pretty 'stock' under the bonnet.
![]()
Something interesting I found was that this design will lock in place when stacked - so you could get a 40mm lift with 2 of these. Could be a good idea if someone was to make and sell these.
I tacked some longer high tensile bolts into the strut tops so they are ready to assemble.
nice design
I like your design....well done....replacing the shock and strut will give you a very nice handling.
While your lift seem easy, and not as flash as the koni insert, it took a few trial and error from other to find a safe and easy set up for a "small" lift. And very good value for money if you ask me.
Regarding the camber change, while the adjustable plate is an option but Fordem found some "offset" bolt to fit at the lower end of the strut, that could be a good option. I don't think that they will fully compensate for the around 1 degree more positive, but should be a good halfway system....if needed....
Happy io
Camber bolts are supposedly good for 1.5 degrees
However - one of the forum members expressed a concern about the clearance between the inner sidewall of the tire and the strut - in my case, I was using the camber bolts to reduce negative camber caused by sagging springs so this clearance would have been increased and therefore not an issue, if used to reduce positive camber, it could conceivably be a problem.
I should point out that there were scuff marks on the side of my struts at approximately the height of the sidewall - I have no idea how they got there as there was a minimum of 10~15mm between the tire and the strut.

.
Fordem, I was thinking about getting camber bolts to fix up my camber due to the lift. I know nothing of them at all, are there specific ones needed for an IO, or are they generic?
I should have a scuffing problem as I am running a larger offset then stock on my rims.
Camber Bolts
The bolts that Fordem used were the Ingalls Fastcam 35410.
It took a while to find the thread, but here it is: http://www.pajerio.com/forum/camber-bolts#comment-1343
We're getting too much info on the forum! :)
Any 12mm camber bolt should work.
Camber bolts are usually described by the diameter of the "cam" or eccentric part of the bolt, which must match the diameter of the original bolt that holds the strut to the knuckle - if you can't find a 12mm bolt, say, because the vendor wants a specfic vehicle, and they don't recognize the Pajero iO, just tell them it's for a Suzuki Vitara or Grand Vitara - it's the same size bolt.
Some LONG overdue updates
From my initial Build post:
Mods:
- so far I've added the pro-rack P-bars (they were on special);
- tow bar
- Bike rack with Canoe rack extension;
- I've had my driving lights/mount stolen.
Future mods:
- Underbody protection
- bigger tyres
- slight lift
- Snorkel and diff breathers
- Maybe a locker?
- Bull bar if I win lotto.
[/quote]
UPDATED LIST:
Mods (in order of completion):
- Roof racks
- Tow bar
- Bike rack with canoe extension
- mounted my 4x4 ECU higher than transmission tunnel
- Fitted 5x 205/85R16 Federal Couragia M/T tyres (29") on 16x7" Mazda Tribute alloys
- Made up a 3 mm gal steel bash plate and transfer case protector
- Fitted brighter headlight bulbs
- Replaced front sway bar mounts and linkages
- Fitted 68L long range fuel tank.
- Lifted rear with Mazda Astina springs (approx +40mm) and new KYB shocks
- Lifted front with early model SWB iO springs (365-370mm free length) on new KYB struts (approx +20mm)
- Fitted Acetal Copolymer strut spacers above front struts (+20mm)
Future mods:
- I'm considering a custom conversion of a D22 Navara snorkel to fit the iO.
- Can't justify a locker or bullbar - The tyres and now the lift should improve it enough to get everywhere I want to go.
- Looking forward to enjoying it more and worrying less about what I want to do to it!
Here are some pics of recent mods:
With (a lot) of help from Claude, I managed to squeeze a 68L long range tank into my SWB in place of the 53L stock tank. The last challenge was modifying the filler tube to fit a hose to the tank. After some tedious work I managed to fit a new longer rubber hose from the filler tube to the tank and it is now fully functional.
Original tank:

Old and new:

New tank managed to squeeze in with some coaxing (after 4 test fit ups!):
It sits lower than the stock tank, which has made the lift more urgent:

BBQ Lunch after iO work day with Claude iO and FocusiO.

A nice range of iO's on display:

---------------------------------------------------------------------------------------------------------------------------------------------------------------------------------------
Suspension lift:
20mm Acetal Copolymer spacers and longer high tensile bolts.
![]()
New struts with early model SWB coils and strut spacers installed. Be careful to get the matching spring and top hat - they differ left and right. The first time I tried assembling these I had swapped top hats and the springs were wonky!

Front end done:
Both ends done:

Strut top with spacer:

The 'After' shot. Unfortunately I didn't take one 'Before'!

This is about the closest 'Before' pic I could find to demonstrate the change in height:

Tomorrow I'll be off to get the wheel alignment done and hopefully the camber will be ok.
Natsterrr.
Thanks to Claude
I didn't mention that the meetup was hosted by Claude. A big thank you to him and his wife for all the help and the BBQ lunch!
We also hit the trails that afternoon as seen in Claude's video part one. I've got a few photos of the afternoon to add when I get some more time :)
My pleasure
Thanks that was my pleasure...
The fuel tank fitting was a bit challenging...but that was a very nice day.... and great to see your car...and you. I like the precise fitting of your spacers...
How does the car drive ? the new strut should make a good improvement...
This week end, I am going with some other 4x4 to the track we seen (we didn't use) when we meet the small group of people and the white Landcruiser...I am not sure how its going to end up...probably on the end of a cable !!! more video on the way !!
Great mods, great pictures...good work![]()
Happy io
Camber
I just got back from getting the alignment done. The only thing they needed to adjust was the toe-in. The camber was 1.00°+ on the drivers side, and close to 0° on the passenger side. They said this was fine and quite normal on 4wd's. (I hope)
They said that my steering rack bushes were a little worn, so I guess that'll be the next thing that needs to be done, but for now its still driving fine.
The ride is noticably firmer, and this morning on my way to work I was purposely aiming for the potholes to try to make sure the springs were seated properly. The car handles potholes a LOT better than before! I'm very happy with it, in 2 weeks I'm heading up to Barrington Tops to test it all out properly :)
Claude: You're a madman for even considering that track! But I have a feeling you'll make it out better than the busted troopy ;)
You're marginally out of spec.
Allowable camber is -0*30 +/- 30'. which translates to -1~0* - if it's not pulling or there's no noticeable offset in the steering wheel position after a turn in either direction, I'd probably ignore it.
One of the issues I had with my iO, besides the wander (the car went in the general direction in which you pointed it it), was that after a left turn the steering wheel would be offset to the left whilst driving straight ahead, and offset to the right , for a right turn - mind you - that was camber change caused by sagging springs.


Very cool, good to see an Io
Very cool, good to see an Io getting into some real action.
Also some very good info on the ECU, might have to look into doing that myself.