Head unit installation

hey guys ive had this pioneer head unit lying around for a few years now.
i bought it for my ipod and i meant to put it in the outlander coz the cd player is dead, but never got around to it.
having a look at it, it looks pretty straight forward.
anyone with experience in such matters? Can anyone help me out at all.
cheers

Easy job
Stereos are easy - well on these older cars with standard DIN head units it is - although some of the non-Australian models have the stereo hooked up to the centre dash display which makes things more tricky :(
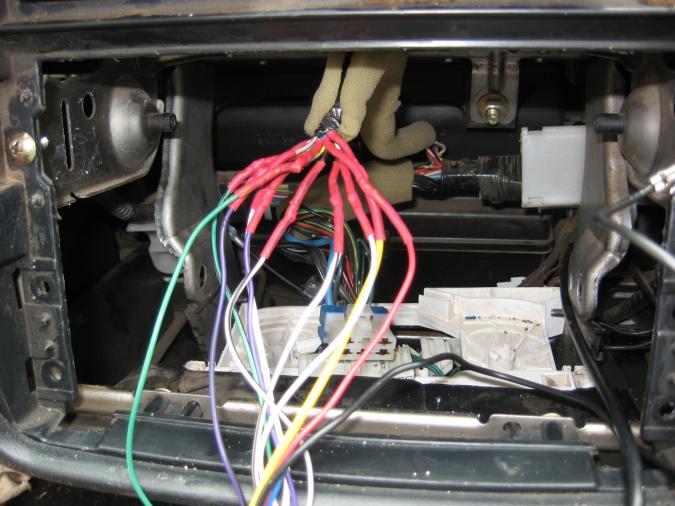
You've got 8 speaker wires which are for the front left / right and rear left /right - a '+' and a '-' for each. These are in pairs of White, Grey, Green and Purple wires; the wire with the black stripe in each pair is the '-'. Check your stereo instructions to make sure you get the colours and corners the right way around.
You screw the black wire from the head unit to the chassis of the car with a ring or fork crimp terminal.
The red wire is for ignition 'ACC' power.
The yellow wire is for constant power (from headlight circuit or similar), which keeps your presets and clock set when you turn off the ignition.
The blue wire is used to remotely switch other accessories, eg. electric antenna or amplifier which only need to be switched on when the head unit is.
And all that is left is the antenna which plugs into the socket, but there are a few different types.
Stuff the solder and heat shrink - get yourself a $10 crimping kit from supercheap or kmart. Try and get one which has pairs of male/female blade or bullet style crimping terminals (or you can buy packs of male/female pairs which will probably cost more than $10 with no crimping tool). Some of the kits also come with piggyback connectors which make it easier to connect the red/yellow wires to existing power lines from the car.
Its a good idea to hook it up with the male on the the stereo side '+' and the female on the stereo side '-', and the female on the speaker/car side '+' and male on thespeaker/car side '-' of each pair of wires. Makes it heaps easier to hook up correctly when you have your head up under the dashboard :)

stereo colour wire
I am working to put a stereo in my new io (99), the old one have been removed and the plug have been cut.....Anyway I think that I found what wires is doing what....it could be wrong but it could help other while replacing their unit. I found a Pioneer DEH-1650 that I am going to try to make work.
Car Radio Battery Constant 12v+ Wire: Red/Black
Car Radio Accessory Switched 12v+ Wire: Blue
Car Radio Illumination Wire: Green/White
Left Front Speaker Positive Wire (+): White/Blue
Left Front Speaker Negative Wire (-): Black/Blue
Right Front Speaker Positive Wire (+): White/Red
Right Front Speaker Negative Wire (-): Black/Red
Left Rear Speaker Positive Wire (+): Yellow/Blue
Left Rear Speaker Negative Wire (-): Gray/Blue
Right Rear Speaker Positive Wire (+): Yellow/Red
Right Rear Speaker Negative Wire (-): Gray/Red
The harness does seems to have a black wire for the ground, I will connect it to the metal frame.
Regarding the stereo, I had a look where the stereo is and I think that it is possible to move the heating/cooling block to the lower section instead of the small glove box. This would leave space at the top for a 7 inch stereo/gps in dash system (will have to cut the middle bar). That could be really cool....
Happy io
Here you go ...
What I'm giving you below is the function or description of the wire, followed by the "standard after market wire color", and then the wire color as used by Mitsubishi
Battery Positive - Yellow - Red/brown
Ignition Switch - Red - Blue
Dash Light - Orange - Green/White
Left Front Speaker (positive) - White - White/Blue
Left Front Speaker (negative) - White/Black - Black/Blue
Right Front Speaker (positive) - Grey - White/Red
Right Front Speaker (negative) - Grey/Black - Black/Red
Left Rear Speaker (positive) - Green - Yellow/Blue
Left Rear Speaker (negative) - Green/Black - Grey/Blue
Right Rear Speaker (positive) - Purple - Yellow/Red
Right Rear Speaker (negative) - Purple/Black - Grey/Red
Ground - Black - no wire in harness, connect to chassis ground.
I confirm this
Thanks, all good, mine have a red and black instead of you red and brown. I used the soldering and heat shrink because I think that it is a bit more reliable.
Some foan added over electrical tape and you can see the heating block in the lower section (not installed, just to show you)

Thanks,
Happy io.

Hi would you be able to
Hi would you be able to supply the link for the youtube vid you were watching? Confident with the electrics of swapping head units, but have seen far too many broken clips and rattly dashes to just try and pull the dash apart without at least some minor instruction. Or if you know of any pics? Thanks, Jackie
.
Hi would you be able to supply the link for the youtube vid you were watching? Confident with the electrics of swapping head units, but have seen far too many broken clips and rattly dashes to just try and pull the dash apart without at least some minor instruction. Or if you know of any pics? Thanks, Jackie
Welcome to the forum, you won't brake the clips here, hold the section under both vent by hand and pull, it will come out, NO screwdriver to try leverage or you will damage the plastic.
Happy io
How big of a job is it?
How difficult is it to mount the HVAC controls in that position?
I was about to move my supplementary gauges (oil pressure & voltmeter) from where they are on the top of the dash where the clock originally was, down to that position, so that I could add a transmission temperature gauge, but, they would more visible (closer to line of sight) if they were mounted where the HVAC controls fit.
relocating the heating control
I don't think that it is too hard.
On his original position it is hold by 2 screw on either side, the new position doesn't have the holes but I think that the frame should hold it.
At the back of the unit it does have an extra support (right side only) and it will need a new homemade bracket to replace it, it might be ok without it but would be better with.
Two cables are connected to the unit ( for hot or cold and for the direction), the one on the left will move without a problem, the one on the right might be the only problem as it is a bit harder to move to the lower section.
One screw on the right side needs to be cut as it does push it out of center,
The stereo have to be removed, and all the connection to the unit too before you can move it. The cable are a bit of a pain to work out, use a short flat screwdriver and look with a mirror, on the top, to see the holding clips.
The 2 "possible" problems is that the frame is strong enough and the cable on the right side.
I think that I have seen this done on a car for sale in Japan (import car dealer), and having that big space for a big screen would be great too.
Happy io.

Under the vehicle
i wanna install a sub in the boot, any ideas on how i cn run the 12v power cable from the battery.
I ran one (not for ICE though) to get power to the jack storage area for some accessories along the chassis and it enters the rear end through the fuel tank cover.
Double Din Head Unit?
I just found a picture of a jap import with the set up I mentionned...I think that it could be a great space for a gps or other....
Happy io...

With the double din stereo, would it just plug back into the original wiring of the car? Also what double din adapter kit would fit our vehicles?
.
I don't think so but I am not sure, adaptor might exist but again...no idea, sorry. I had to fit a different stereo in the past, I just found what is what (cable to whatever, left front speaker, positive and the rest ) and cut the existing plug. The main problem would be to move the existing heating/cooling control to the lower section. I was going to do that but choose to buy a tablet instead. I had a good look, I think that it can be done, one of the cable might be a problem but the room is there.
Happy io
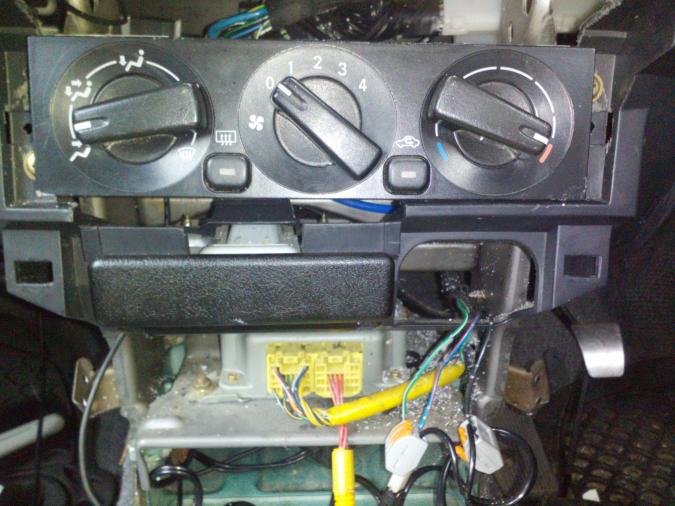
I just moved the heating
I just moved the heating controls on my 1998 pinin, it wasn't quite as straightforward as one would at first think. So below are a couple of pictures in case anyone else decides to do this.
It was necessary to cut away part of the control supporting the temperature control wire and relocate the control actuator plate to the otherside.
I did try drilling chassis first to try and thread the cable through it, but it was too long and this was the simplest.
To relocate the plate it is necessary to push the clips retaining the control knob so it can release the plate and then place the plate on the otherside before re-engaging the knob.
You should be able to reuse the metal rtaining clip for the wire, but I lost it so used cable ties.
It was also easier to cut out some of the plastic which is hidden when the central console is in place otherwise it simply was too difficult to insert lower down.

all wired up
the fuel tank cover, i have to remove the rear seat right?
Yes, there is a cover on both sides actually - I chose the RHS as the battery is on that side. I ran a twin heavy cable so I had a direct earth return and followed the route taken by the brake lines. To get at the cover as I recall the seat rear has to come off (as well as the base which in my case just lifts up and out). Depending how the seat's floor bracket is arranged you might have to remove both seat backs cos in the centre fitting one bracket sits over the other.
It should take about 90 minutes to get all the rear seat(s) out.
There are two bolts on the RHS bracket, two NUTS on the centre bracket and two bolts on the LHS bracket. I was thinking of leaving the seats out to reduce weight and increase luggage space but I have nowhere to store them.
I used a former on the fuel tank cover as it is fairly thin to shape a small "U" for the wiring to exit through. I wish I had taken some pictures now as it is easier to explain.
Wiring adapters are available ...
At least they are in the US - I bought a Scosche kit in a Walmart and wired that to the harness that came with the stereo, and just plugged it in to the original connector.
In terms of difficulty it's pretty much the same as Claude would have done, except that I could do it at a work bench, rather than in a "hole in the dash", and that makes for a whole lot of convenience.
hello, I put in a alpine unit
hello,
I put in a alpine unit in my 2001 io wiring details on forum is correct ... not sure if its the same for your outlander ..
Its pretty much straigh forward .. normaly you can even us the same factory radio mounts for your installlation ..
sorry cant help any further ..
good luck ..
Hi, I've connected a new head
Hi, I've connected a new head unit as per the instructions here, radio works fine but the speedo and odometer have stopped working. The odometer shows a value but doesn't go up - the speedo does nothing at all.
Checked all fuses and it's fine. Disconnected the radio and put the original back and speedo works fine. Any ideas why? Google search doesn't really help - others have had similar problems but can't find a solution
Thanks in advance
It is straightforward - from
It is straightforward - from memory there's just a few screws to remove the dash surround and then you've got easy access to the existing stereo. Depending on what cables you got with the unit, you might need a lead adaptor which plugs into your head unit at one end and the Mitsi factory plug at the other, and another adaptor for the aerial if they're different types. These are available at your local stereo shop, or eBay. If you're not confident about the job just go to your local stereo shop for help - if you buy the adaptor lead off them they'll probably be happy to talk you though it, or do it for you - it's a 10 minute job.