How to add EXTRA button to Pinin Computer and operate without oryginal Mitsubishi CD/Casette player [thread]
needed elements : cost aprox 1 USD for booth. ( micro switch + on my case adiustable resistor )
here you have again from imageShack
how to connect :

and how it looks ..

and movie : https://
needed elements : adiustable resistor who can be fixed between 6,1 to 6,8 K ohm
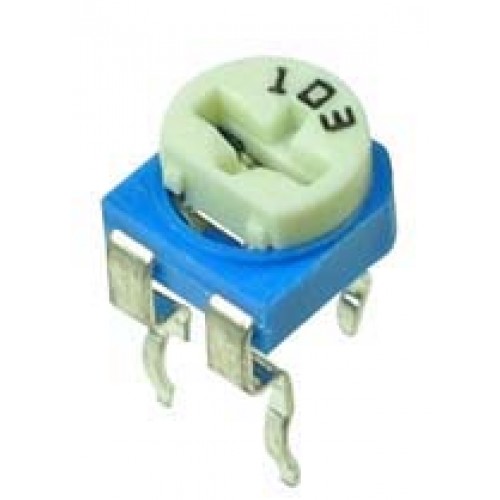
and one microswitch like this one :
INFORMATIONS :
Resistance is different depends of model of You LCD / Computer
That's why i use adjustable resistor : some ppl mentioned about 6,1k ohm , some about 6,9k ohm ... on my case 6,8k
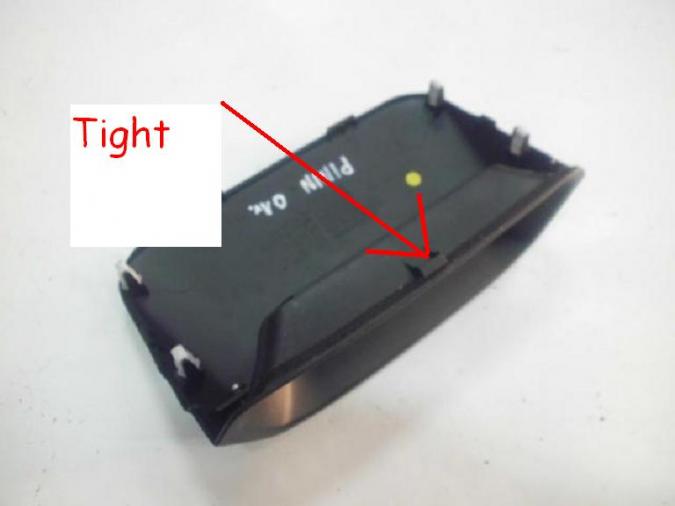
and implemmentation on my LCD
Grettings for UKRAINIAN Pajero IO Community ..
ps. very helpfull will be this kind of glue ( thermal )

1'st - is very easy to fix by this glue our extra button on place ..
2'nt - do not forget to fix resistor position by this glue ;)
let me chceck this issue with
let me chceck this issue with other users here in PL, and i'll back to You with correct answer.
here we have only engine versions 1,8MPI 1,8GDI and 2.0GDI
Normally all of our cars are eqiped with OBDII diagnostic interface and by this interface we are abble to read fuel consumption value
and this is provided by ECU..

as you see on W142 Mitsubishi CD Player we have DISP button - and this button can only change the computer/Display values
that is mean NO Oryginal CD = no acces to this data.
http://www.youtube.com/watch?v=35mvkkM33jM&feature=youtu.be here you can see the same mod based on this thread realized by one Pajeo Pinin user from Turkey, as you see he have no CD but old one casette player BUT with DISP Button..
i have no idea which kind of ENgine and ECU you have in Australia ;((( soory ..
ps. Your Australian Version of Pinin / IO have no this button on CD player or Casette player ?
regards
(pk)

Hi, what a great mod. I did
Hi, what a great mod.
I did this tonight and it worked as described.
However there is one function that the [display] button on the W142 missing, and that is the reset option. When mileage is selected you could reset the value to 0 by holding the display button.
But on the new button this does not work.
Does anyone have a solution for this.
Regards.
HI, Pleasu use 1'st button
HI,
Pleasu use 1'st button from left side - this undescribed... ( hold him until you hear short "beep" sound )
Let me know about the results ;).
ps. i chcecked with PL Community about 1.8MPI display this values too = noy only GDI have this function

removal of ....
We only have the clock under the top hood on the top of the dash, but it is probably the same. To remove the top hood, use your fist to gently push up on the upper section of the hood, it will unclips. Once the hood is removed they are some metal "L" shape bracket with a couple of screw on the side.
For the front panel, hold the silver trim section with both hand just under the both vent, then pull, it will unclips. Once you have that section out, the stereo is only holding with 2 screw on each side.
Please, no screw driver ! In Europe, plenty of car, like the Citroen, have very weak annoying clips to hold different plastic trim; these are pretty good and don't break that easily.
Happy io

Sounds nice and straightforward
We only have the clock under the top hood on the top of the dash, but it is probably the same. To remove the top hood, use your fist to gently push up on the upper section of the hood, it will unclips. Once the hood is removed they are some metal "L" shape bracket with a couple of screw on the side.
For the front panel, hold the silver trim section with both hand just under the both vent, then pull, it will unclips. Once you have that section out, the stereo is only holding with 2 screw on each side.
Please, no screw driver ! In Europe, plenty of car, like the Citroen, have very weak annoying clips to hold different plastic trim; these are pretty good and don't break that easily.
Happy io
Thanks Claude - will get around to it soon once I have the axle leak sorted.

Thanks for mentioning no screwdriver, I hate it when I have to lever it with a screwdriver.

.
To remove the top hood, use your fist to gently push up on the upper section of the hood, it will unclip.
I tried that but there is one clip that feels more like there is a screw. It won't shift and any more pressure will break it.
Once you push up the front, the front side will pop out, then do the rear, then slide the all lot toward the windscreen this last step will have that section coming out. No srew, and please don't brake it :)
Happy io
Resistance
I have found the potentiometers on eBay and I assume we need 0-10kohm pots for this application.Which if any of these will be ideal?
http://www.ebay.co.uk/itm/10X-10-Pack-6mm-Horizontal-Pot-Variable-Cermet...
http://www.ebay.co.uk/itm/10X-6mm-10k-ohm-Horizontal-Pot-Variable-Cermet...
http://www.ebay.co.uk/itm/5pcs-WTH118-1A-2W-Potentiometer-6-8K-Ohm-/1606...
I assume that if set to zero this will have no advewrse effects. Did you set the resistance with a meter or guesswork?
As for the switches do we need momentry tactile types like these? Was there a shaft size in particular?? How long does the button need to be?
http://www.ebay.co.uk/itm/Tactile-Switch-6x6x5-5mm-Momentary-Push-Button...
http://www.ebay.co.uk/itm/1PC-1000PC-Momentary-SPST-Tactile-Push-Button-...
Thanks
assume that if set to zero
assume that if set to zero this will have no advewrse effects.
yes.
Did you set the resistance with a meter or guesswork?
guess work + the meter .. i mean - i fix it on 6,1 k ohm then i try to connect .. without soldering .. then 6,2 etc etc .. at mine Pinin tat start works at 6,8..
As for the switches do we need momentry tactile types like these? Was there a shaft size in particular?? How long does the button need to be?
type is okay .. button should be longer then basic type.. as i know they produce three types of button lengh .. so this is this middle one .. aprox 0,5cm ? but i try to guess now correct answer.. i not remember ;) ..
from your second ebay link - for sure - you need this small type .. and for sure will be fit second and thrid one from second row ( when i count them from left to right )
I have found the potentiometers on eBay and I assume we need 0-10kohm pots for this application.Which if any of these will be ideal?
honestly - i go to the electronics store and i ask them about this - they give me this resistor and that's all .
i ask about resistor who can be adiustable from 6 to 7 k ohm ..
Thanks
How long does the button need to be?
type is okay .. button should be longer then basic type.. as i know they produce three types of button lengh .. so this is this middle one .. aprox 0,5cm ? but i try to guess now correct answer.. i not remember ;) ..
from your second ebay link - for sure - you need this small type .. and for sure will be fit second and thrid one from second row ( when i count them from left to right )
Many thanks.
I chose the 7mm tactile switch and 0-10kohm pot.
;)
Many thanks
small thing, my pleasure - today i must demount this device again - cold solder issue's on LCD Display. so i make better thread with photos from the process of disassembly.. casue if You have the question = thread isn't good enough ... ( my fault ) ..
cheers from Poland !..
Wahay
Today the cowling just came off no sweat. The clip that would not shift was the first clip off!! Go figure!!![]()
I think it is best to pull up the cowling at the front (windscreen ) first; the clips do come away fairly easily.
So now I am waiting for the electronic bits to arrive so I can do the electrical connections.
Where did you go to for the earth; did you use one of the four retaining bolts?
How did you make the hole for the tactile switch?
At last
Right, I have had a go at this - see here
http://www.pajerio.com/forum/how-i-added-my-extra-dsp-button-so-i-can-fit-my-own-usb-radio
It seems not to work.![]()
Is this "it" for my 4WD
Hi, I wonder if someone has the pics from imageshack? The whole desription of this mod would be great. Thanks \H
Is this not any use.
http://www.pajerio.com/forum/how-i-added-my-extra-dsp-button-so-i-can-fit-my-own-usb-radio
I m sori to buder you but tha linc wer ta foto wi
needed elements : cost aprox 1 USD for booth. ( micro switch + on my case adiustable resistor )
here you have again from imageShack
how to connect :
and how it looks ..
and movie : https://
needed elements : adiustable resistor who can be fixed between 6,1 to 6,8 K ohm
and one microswitch like this one :
INFORMATIONS :
Resistance is different depends of model of You LCD / Computer
That's why i use adjustable resistor : some ppl mentioned about 6,1k ohm , some about 6,9k ohm ... on my case 6,8k
and implemmentation on my LCD
Grettings for UKRAINIAN Pajero IO Community ..
ps. very helpfull will be this kind of glue ( thermal )
1'st - is very easy to fix by this glue our extra button on place ..
2'nt - do not forget to fix resistor position by this glue ;)


I've ordered the necessary
I've ordered the necessary hardware, however rather than modify the LCD unit itself, could possibly the same be achieved by earthing via resistor/switch one of the spare wires in the multiplug that is now redundant following removal of the Oem head unit?
After all, it is through this multiplug the 'disp' signal originally came from.
Worked great for me as per
Worked great for me as per description.
Fiddly fitting the extra switch, make sure you don't get carried away with the glue. First attempt ended up sticking the button so had to replace, second attempt okay but had to trim the glue so the LCD screen fitted back correctly.
Worth it all in the end.
Worthwhile modification for sure.
what other items are needed?
We only have the standard clock item here in Australia,
what other items are needed to run this trip meter / range / fuel economy functions? is there a stand-alone CPU unit that drives it or is it all off the ECU?
.