Daniel's iO

Tyres
Now onto my tyres.
205/80 Bridgestone Desert Dueler
LT construction gives it a good base for wear and tear.
Soft Tyre Compound gives it a good feel on and off road in order to absorb and conform and stick to an obstacle.
ON-ROAD
Tarmac Handling ****
-Dry ****
-Wet ***
Road Noise ****
Braking ****
On road these tyres are very well balanced IMO. they are very well suited to use on road with minimal road noise and provide a nice smooth ride in dry conditions. i find that on a smooth 'A-Grade' road surface they tend to be a little louder, but generally are not to bad. things can get a little bit interesting when in the wet but are generally pretty good. it's only when i thrash it around roundabouts that i get a bit sideways whilst on my way to the firestation in a hurry, but thats to be expected i reckon. drive to the conditions and its as good as any tyre IMO.
OFF-ROAD
Gravel/Track ****
-Dry *****
-Wet *****
Sloppy Mud/Clay **
Mud (water crossing) ***
Sand *****
Shale/ Loose Rock ****
Loose Dirt ****
Rock N/A
Obstacles ****
Overall the off-road conditions of this tyre are pretty much like what is to be expected from an A/T Tyre. I find that on a wet track the Tyres handle a little bit better as the ground is more compacted a bit making it more like a road surface, though if it gets too wet the can slide around a little. On the Dry track they are exceptionally good. No sliding around and after lowering tyre pressure they get more traction than what you would believe. Exact same goes for Sand, Shale, and Loose Rock and Dirt. As for Sloppy mud and Clay, these tyres are of little to no good. Mud gets stuck in the tread and is unable to be ejected automatically without you getting out to do it yourself, and its also very difficult to find any traction until you get to a drier patch. As for water crossings, they tend to be a bit better, but i think its more to do with driving technique rather than finding traction in this case. a bit of momentum and a good foot on the throttle where its needed is vital. I reviewed obstacles as in tree stumps, ruts and rocks etc, in the middle of a track. With lowering of the tyre pressures i found that the tyres would conform and shape around the obstacle giving the vehicle more leverage to get over said obstacle. But then again you have to judge for yourself what you think you can get over and what you think you need to go around. The tread is IMO a pretty soft compound, therefore giving it good qualities in the sense of stradling tree stumps and roots, rocks and ruts in order to get over them.

You have been busy
You have been busy, that shelving looks like a good idea....
You wrote
Been away for a while it seems without updating my thread, so thought id chime in. Reason for being away? Im joining the army and was trying to get through the process of application. Heading out to training on July 2. Then ill be based in Richmond, NSW. Looking forward to it...
Felicitation and all the very best for your new career.
Happy io
OK here a some pics and some
OK here a some pics and some explantions...
starts of by bolting the rear most part of the shelf to the plastic interior moldings above the rear vents. you should all see the vents in your cars. i cut them out completely. along with being able to get my hands in there to bolt the shelf down, it gives me storage for tie down straps, or snatch straps on each side.
this rear most but of the shelf was the only part of the shelf for some time. it gave me room to store my firefighting gear underneath, whlst giving me a floor for any other gear/shopping etc. and the seats were still able to be folded up. if you can imagine it without the secondary hinged part of the shelf , thats all it was. sorry i dont have any prior pictures. for strength i attached two lengths of 20mm steel square tubing to support any weight on top of it.
Second part was adding the hinged extension. i decided to hing it so i could still fold it up in order to fold up the rear seats if i needed them.
i used gate locks to secure the second part down so that it would flop about over bumps. as for the anchor points for the gate locks i just screwed them onto a wooden base then secured the base straight to the interior plastic moldings with plain wooden screws... my primary reason for adding this extension was for it to be big enough to carry an esky or in my case my ice-box.
Just underneath the shelf in this picture you can see the white of the body of the car, behind the vents i cut out. VVV
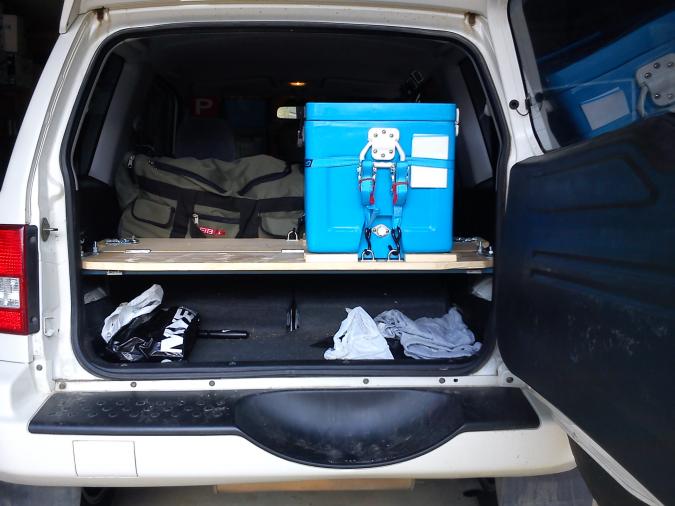
I also added some hardware to tie the box down, and added some feet to act as a frame for the box to sit in whilst still on bare wood
Finally afetr about 6 months i decide i would trim and carpet the shelf. i went for a charcoal grey rubber backed marine carpet, accomponied with a 3mm aluminium trim.
In this picture you can see the steel tubing i attached underneath for strength and also how the seats fold underneath the shelf. you can also see my bags stowed in behind the shelf. the gap i left there was intentionally made for this purpose, especially if anything was too big to fit underneath.

i also removed the feet i had installed for the ice-box, as i thought that i was less likely to move around on carpet after i tie it down. VVV
Overall the shelf build must have cost around $100-$120 including the carpet and trimming. i used pretty standard pine timber from bunnings and trimmed it down to size. i got everything in this build from bunnings. i bloody love that place. i only needed to trim off maybe 20mm for it to fit. oh and i had to shape it to go around the corner and to fit the styling of the interior of the rear door. i cant remember the exact measurements but its not hard to figure out if your going to try to build something similar.
I highly recommend doing this if you want a shelf, its a great cost effective DIY job that really gives you a lot of satisfaction in the final product. it also gives you a good base if you happen to need a cargo barrier. the greates thing about this shelf is that it is easily removed if need be, and even with it in place the rear seats can still be accessed and used as the manufacturer intended. its full functional and you can add so much more to it. it could be used as a base for rear drawers, which i am considering, or add a fridge slide on top also. add more hardware to it, such as tie down poins like i have and you can put a cargo net in there or indeed use them for what i have them for, tie down my esky/ice-box.
CHECK OUT MY BUILD VVV
http://www.pajerio.com/forum/daniels-io