R A Teabag's 1999 1.8L 5-door automatic Pajero iO
Hi. The V.I.N. of my Pajero iO ends in 000339, so I am guessing that it is the 339th Australian delivered iO. When I bought it, it only had about 20,000 klms on it. Mrs Teabag had seen it in a car-yard (from driving by). She wanted it, and told me to go and have a look at it. I knew that she wouldn't be happy if I didn't come home with it, so I bought it.
I have made some changes to it:
Steel wheels
Larger all-terrain tyres
Alloy bullbar
Roof cage, with mounting for gas bottle
Pull-out side awning mounted to roof bars
I also have a hand winch, and comprehensive recovery kit, located in the rear luggage area.
I intend to make some other changes. However, I don't intend to say "I'm gunna do this" and "I'm gunna do that". Instead I will describe things as I do them.
My best trip so far has been going to Craig's Hut "the hard way" (over the top of Mt Sterling). This track is rated "Black Diamond" (difficult). The sign says "no road tyres, and no low-clearance".
Steel Wheels
My steel wheels are from a Ford Escape, which is the same as a Mazda Tribute. They are 16 x 6 1/2, with an offset of 28mm. If I remember correctly, they are half an inch wider than the original iO wheels, and that half an inch is on the inside. So, at the front of the car, they sit a bit closer to the strut than the original wheels. This is not ideal, but it works. These wheels can be obtained at low cost on EBay. They are usually sold in sets of 4, because the owner has put 4 alloys on their car, and kept the steel spare. I bought a 5th one from a wrecker. That one cost about the same as all of the other 4 together.
The tyres are Toyo Open Country All-Terrain (OPAT), and the size is 215/70R16. These sit quite close to the lower spring seat on the front struts. However, they don't rub on anything. This is the size tyre that Mitsubishi Japan said that the iO was fitted with, in their press release back in 1998. The speedo reading is incorrect on my car with these tyres on. I checked it against my GPS, and if I remember correctly, it's 8% out. To be safe, if the speed limit is 100 kph, I drive at 90. These tyres make audible noise on the highway, but it is quite mild and easily ignored.
I actually wanted a set of Sunraysia wheels, but I couldn't find ones to fit at the time. I tried some 15 inch steel Ford Falcon wheels on, but they didn't clear the brake caliper. I tried some 16 inch Ford Falcon wheels on, but they didn't fit either (if I remember correctly, they have the wrong offset and that makes them touch the strut).
I also have a set of original alloy wheels fitted with highway tyres, in size 225/60R16. These have the same diameter as the original tyres, so the speedo is correct. This size tyre is common, being fitted to VE Commodores. I am using 34 PSI. I am much more happy with this set-up than the original 215/65R16 tyres. The specified pressure for them was 26 PSi, and the car wallowed in turns and when changing lanes. If I increased the pressure (I tried 32 PSI), it rode very hard. The 225 width tyres that I now have look a little wide for the 6 inch rims, but the tyre manufacturer approves of fitting them to this size rim.
It is a bit of effort to change the wheels over each time that I go on a 4WD trip, but I think it is worth it. It means that the tread on my All Terrain tyres will remain deep and chunky for longer, because I am not wearing them out in day-to-day highway use. When I go off-road, my steel wheels are less easily damaged than alloys. And, in everyday highway use, I have the best grip, in wet or dry conditions.
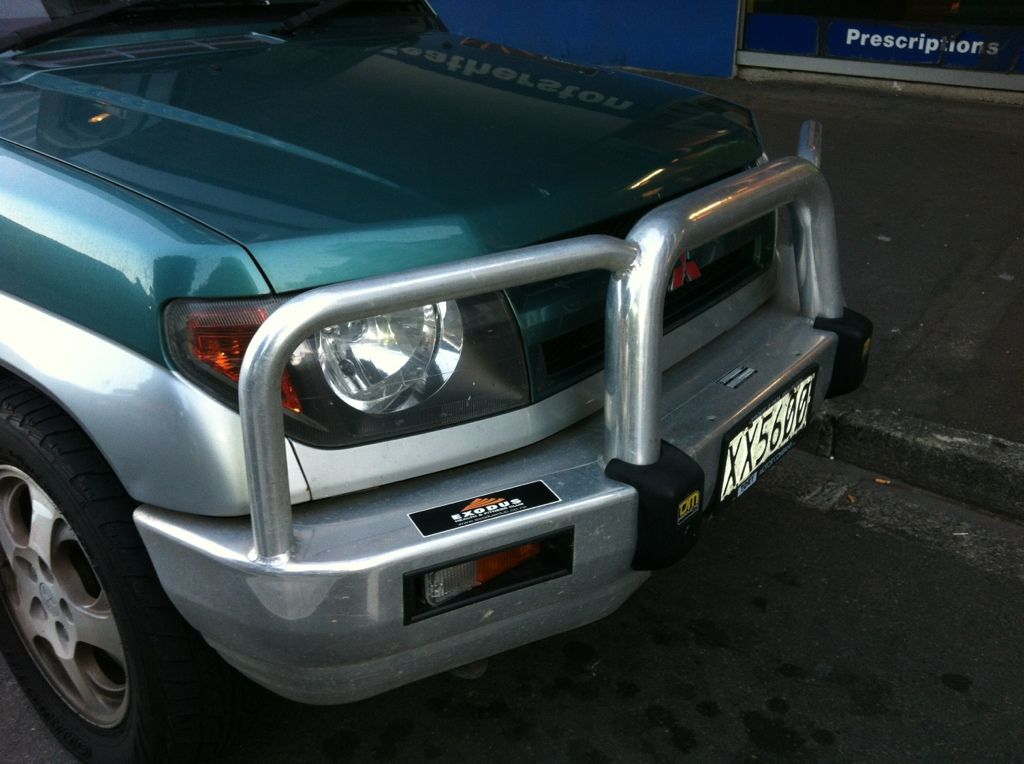
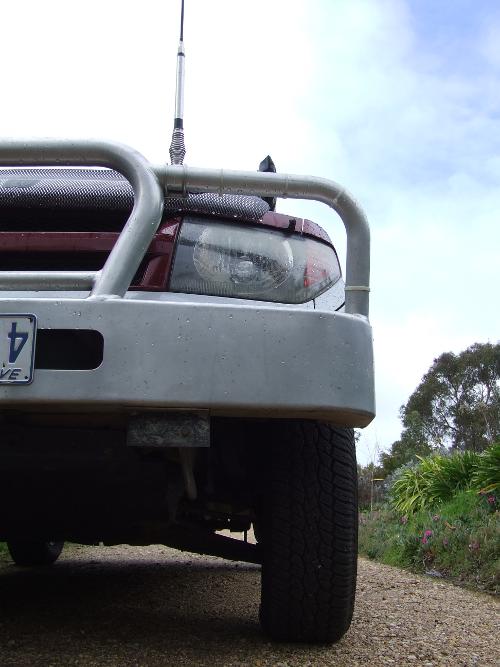
Bull Bar
My bull bar is an aluminium alloy one that was made for a Ford Explorer. Where I live there is a very real danger of a kangaroo jumping in front of you, mainly at dusk, or dawn. So, I needed some extra protection. There is a bullbar made specifically for the iO, by a company in Western Australia. I would have liked one of those, but I am a cheap-skate. So I looked for something that I could buy cheap on EBay.
I had to do a lot of cutting and grinding (of the bullbar, not the car). I am not completely satisfied with the way that I have attached it, but I believe that I can improve on it.
When I think of all the work involved in researching what might fit, then bidding on it, and travelling to collect it, then modifying it; I probably should have just bought a "real" one.
The Parkside bullbar that is made for the iO is Airbag Compatible. The product code is BB87AIRBBM57. The price is (or was) $1925 fitted, or $1765 take-away. Their e-mail address is sales@parksidetowbars.com.au .
CORRECT
Singlecell is correct. If members are interested in this subject, they may like to read the statement by the Australian College of Road Safety. Here's a link: http://acrs.org.au/about-us/policies/safe-vehicles/bullbars/ . They oppose the fitting of bullbars, because they think that they may increase the risk of injury for pedestrians. However, there is some interesting technical comments in the report, and these include ones about air bag compatibility.
Here's a pic that I took
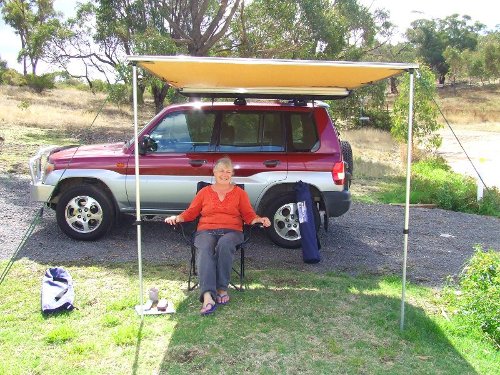
Here's a pic that I took earlier. It was taken to show off our new Ironman awning. It comes out 2.7 mtrs, and we have found it very handy. We purchased it for a trip we did earlier in the year. Our tent is a dome-shaped one, which is just for sleeping in. So, the awning is good for something to sit under, and for somewhere to set up our gas stove. On our trip to the Mitchell River National Park, we had a bit of rain. Without our awning, I think we would have had to give up on camping. We learnt that you just have to lower one of the outer corners of the awning (the poles are adjustable for height), and then the water just runs off (instead of pooling in the middle, and causing the whole thing to collapse).
In the photo, the car has the alloy wheels with Bridgestone Turanza highway tyres on. We also have a set of steel wheels fitted with Toyo Open Country AT tyres, and I put these on whenever we are going on an off-road adventure. The spare in the pic seems to be one of the AT's so I must have already put that on in preparation for our trip. Although these tyres are bigger, they still fit on the spare wheel mount without any modification. They are quite a bit heavier, so they must put additional load on the door hinges.
The awning is stopping you from seeing it, but on the roof-bars I have mounted a wire cage (or crate). It has within it, 2 lockable spaces that will each take a 4.5 kg gas cylinder (but I only carry one). In another compartment we carry 20 litres of drinking water. This has a plastic hose that leads down to the bullbar, where we mount a tap when we are in camp. The tap attaches to one of the tabs that are provided for mounting spotlights, using a quick-release bolt from the seat of a bike.
The tint film on the windows was already installed when I bought the car.
The Ford Explorer bullbar is also visible in the picture. Don't buy one of these for your iO before getting more info from me.
I wouldn't mind seeing that bullbar myself
My recollections of the Ford Explorer are that i's a big gas guzzling monster (got one as a "free upgrade" at a car rental place in Florida two years back, and since then, I have always declined the upgrades) and the only way I can see an Explorer bar fitting on an iO is with quite a bit of cutting.
Fordem, I don't remember the
Fordem, I don't remember the year of the Ford Exolorer that the bullbar came off of, but it was a "big gas-guzzling monster". Strangely though, the bullbar is just a little too narrow for an iO. That is one of the reservations that I have about recommending one for the iO. There was a lot of cutting of the bar to do, mainly because I wanted to get it back as close to the car as I could. Also, every bit that I cut off was useful in reducing the weight. This bullbar is made of aluminium alloy, but it is very thick.
This "bullet-resistant" bullbar was designed to mount directly onto the equally bullet-resistant frame of the original car. One of the problems that you have in mounting a decent bullbar to an iO is finding something solid to attach it to. It is not an impossible problem, and it helps if you say to yourself that you are not designing it to survive an impact with a bull, but rather a large 'roo. Even so it will be hard to ensure that a hit on one of the tubes that suround the headlights and the radiator won't twist the bar back on it's mountings.

tyres and speedo
Nice picture, Is it Mrs Teabag?, aren't you glad she made you buy the io:) I like these awning, very nice and practical. I was going to get one, but they look a bit too big on my little 2 doors!
Going back, in your post talking about tyres and speedo, you wrote:
"The tyres are Toyo Open Country All-Terrain (OPAT), and the size is 215/70R16. These sit quite close to the lower spring seat on the front struts. However, they don't rub on anything. This is the size tyre that Mitsubishi Japan said that the iO was fitted with, in their press release back in 1998. The speedo reading is incorrect on my car with these tyres on. I checked it against my GPS, and if I remember correctly, it's 8% out. To be safe, if the speed limit is 100 kph, I drive at 90. These tyres make audible noise on the highway, but it is quite mild and easily ignored."
We don't have the same car but while I had the 215/70/16 my speedo was perfect (with my gps). You mentioned a difference of 8% between the 215/70/16 and the 225/60/16, that seems a bit much isn't it? I found (again,with my gps) 5% difference between the 215/70/16 and my new 225/75/16. You might be a bit over, and I might be a bit under:)
Originally I had 215/65/16 and never check the speed with my gps (didn't have it!) but I think that the speedo was higher than the real thing (ie 100 while doing 96km/h)
Having 2 set of tyres is the best of both world, I was going that way too, but I don't have the space for an extra set and I am a bit lazy to do the swap!! (and they are heavy to move!)
Happy io

Talking of bullbars
Walking down the street I spotted this bull bar fitted to an io - the owner was sitting in it parked up and said it was on it when he bought it as a Jap import. I took a pic for you all...
http://i669.photobucket.com/albums/vv56/targadon/fbb59302.jpg
Dear Forum Friends
Dear Forum Friends, who have requested photos, and asked questions, I have been a bit busy with other things. I will definitely reply during the next week. Mrs Teabag has been busily planning our 10 day trip to the Flinders Ranges and Lake Eyre. This will happen in September.
Last week we visited Tigerz11 in Lilydale. They had "Staun type" tyre deflaters for $10 a set of 4. I had been in 2 minds about whether to get this style, or the one with the dial, that allows you to remove the valve core. When I saw the "Staun type" for $10, I grabbed them. However, since playing with them, I am not in love with them. Has anybody on the forum had experience with this type? Sure, they let your tyres down for you, but it seems to take a long time. Perhaps I am doing it incorrectly?
Tyre deflator
I haven't bought tyres deflator, but have been tempted a few time! I can see the advantages of them But it only take me under 4 minutes to deflate my tyres. I do it with my watch, 45 sec for around 12psi drop.
How long do they take to deflate one tyres, I think it is safe to say that it should be close to 30/40 sec. In any case, $10 is a bargain (if they work properly that is!) and if you don't like them, resell them for...$20:) My understanding is, screw in, then screw out, there isn't much place for getting it wrong...
Happy io

Stauns
I've got a set of the staun's.
They may take a little time, but at least you don't have to be crouched over with your knees in the mud while they do their thing :)
One thing I am a little not sure about with them is that they aren't totally accurate. I have thought about lubricating them a little to make them more accurate, because there is a little bit of friction which can alter results by up to 2-3 PSI. For example, when it is deflating, if you tap on the end, it will eventually cause it to stop when the pressure is about right. If you quickly pull on the end and let go, it will sometimes continue to deflate for a few more seconds, or sometimes it will remain stopped.
The end result is that I always check my pressures with a gauge after deflating with the Stauns, just to be sure. The ARB rapid deflator looks to be the best bet I think.
Tyre Deflators
Thanks for the helpful advice / comments. I believe that the Staun type are meant to go "pop" when the deflating is complete. So far I haven't heard them do that.
The Tigerz11 version of the ARB Rapid Deflator is called a Kwiky Deflator, and costs $25. I think that I will get one.
Progress
Dear Friends, I am sorry that some info and photos that I said I would provide has not been forthcoming yet. My excuse is that I have been busy.
I have found time to do some things on the iO. I have installed a UHF radio (the kind where all of the controls are on the mike). I bought it from Gadget City the price was good, everything was included, and it arrived quickly. The only extra thing that I needed to get was a clamp-on bracket for the antenna, since my bullbar didn't have a welded-on one provided.
I have also bought some raised King springs. I am getting ready for our trip to the Flinders Ranges and Lake Eyre at the start of September. I would have prefered to fit spacers above the struts at the front, but I didn't have time to make them. I hope that the raised springs will be OK for the trip, but I am not happy with the lack of downward movement that the struts have left. When one front wheel goes into a small pot-hole, the struts reach the end of their downward travel, and go "clunk". The back springs are good, and went in easily. The front ones were very scarey to fit. My handy-person spring compressors were strained almost to the limit, and I feared that I would be killed, or injured, or both.
My iO has 2 radiator fans (do they all have 2? - I don't know). Anyway, one of them never seems to go around. It's the one on the left side of the car (looking forward, sitting in the driver's seat). The other fan (right side) comes on when the clutch on the air-conditioning compressor engages. The engine got a bit hot when we went over Mt. Stirling, but I didn't check whether both fans were going at the time. I didn't even note whether the air conditioner was on at the time. I have been thinking of fitting an oil cooler for the automagic transmission. However, I don't like where they suggest that you put the cooler (in front of the radiator). But, I can't think of a good place to put it.
I'm pretty certain that's not right.
You'll never find a vehicle with factory fitted electric fans that run them constantly, they will be thermostatically controlled - the forward motion of a moving vehicle causes enough airflow through the radiator that a fan is for the most part, not necessary.
The fans on the iO are variable speed and independently controlled by the ECU, the right side fan is the "main" one and will turn on and off with the air conditioner, and also comes on at low rpm if the coolant temperature exceeds roughly 90*C, I don't have a cut in temperature for the left side fan, but it will come of if the coolant temperature rises high enough.
I second what Fordem said
My car does the same as "Teabag" one goes "on" when the a/c is switch "on" . The other does go "on" when the engine reach a certain temperature (as Fordem said, around 87/90°). One way to check if the fan is working is to let the engine run, parked, at around 2000 rpm even 3000rpm at time, and check the t°gauge inside. The fan should come on after a few minutes. If the t°gauge go other the 2/3 without the fan going on, you may have a pb.
For your strut, I wouldn't drive like that, they are max out (no down travel left) because of the lift and it could be dangerous. The original front down travel is very small, around 8cm, by lifting the car you loose some. Some have fitted some strut extender to compensate this. We don't all have the same view for the reliability of them, but so far, no drama. Type "strut extender" in the search box.
Happy io.

.
With the new style struts those springs give you a 50mm lift, so you make 50mm strut extenders to place the the strut back in the center.
With the old style you get a 25mm lift, you cant make a 25mm extender as there just isn't enough length in the extender to put the internal tread and spacing. 50mm is about as short as you can make one.
I guess you should put a 50mm one on, but your just losing travel in the other direction.
good point
Good point, I didn't think of the "other direction" . I think, the best might be to measure the existing down travel, and see. This said, if the strut max out easily, I wouldn't be surprise that the new spring have given him more than 25 mm lift. Don't ask me why, but how many in the forum had pb while playing with the front suspension:(
Again, I am not sure, but depending of the actual measurement, the strut extender may still be a good solution, for the "other direction" he just have to make sure that the rubber bump stop is long enough (or fit longer one) to stop the insert before it is fully compressed.
Anyway, the major problem is that if you drive with a strut that does max out, I think that it is unsafe.
The front suspension needs some more, more, thinking to try to improve the lack of down travel.
As too often, I could be wrong...ask my wife...
Happy io.
Fan testing
I recently towed a load of wet sand home in a trailer. The trailer plus the sand would have weighed about a tonne. I didn't drive very fast. I live on the top of a hill, so the car had to work a bit during the climb. In my driveway, I let the motor idle, and looked at the fans. Only the one was going. The temperature gauge was sitting in the middle, like it always does when the car is warm. I have only ever had it rise above the middle of the gauge once, when going over Mt. Stirling. That was low range, first gear, all the way. Hard climbing, and not much forward speed. I think it was that climb that turned my auto trans oil brown.
I would like to find the temp sensor, and put it in boiling water to check the operation of the fans. This seems more scientific to me.
The fans are controlled by the ECU
There isn't a separate temperature sensor for the fans - they are controlled by the ECU through a fan controller mounted on the back of the right side fan (a little silver box), the temperature sensors (there are two - one for the gauge and the other for the ECU) are in the heater circuit - look at the left rear of the engine bay, you should see two coolant hoses at right angles to the engine, one of which has two sensors in it - those are the sensors you're looking for.
You can check the sensors in place with an ohm meter, by allowing the engine to idle and measuring the sensor resistance as it warms, the details are in the service manual.
Flinders Trip
Anisaac, I am leaving home in Central Victoria on the 1st of September, for 10 days. I have booked motel accommodation in Ouyen, and Peterborough. I will be camping for 4 nights. I will be doing Sky Trek, and maybe getting to Lake Eyre South. I hope to be back in Mildura for the Steam Paddlewheeler celebration. Any further posts on this subject had better go in the section that has been provided for trips.
droop extenders
I think that's about what I had after fitting the new struts to an early model io - not enough. There's details on the strut extenders I had made up from old struts in this thread http://www.pajerio.com/forum/nzio-front-rear-lift-was-raised-rear-springs?page=1 . They are loctited in - I've checked them several times and no movement. As noted in the thread, you could add a grub screw if you want some extra security. I have since dropped the diff by 25mm to reduce the extremity of the drive shaft angle at full droop. Usual disclaimers apply - I'm not an engineer, this modification may need certification in your country/state, etc.
High Lift Jack
Yesterday I bought a high-lift jack from Super Cheap Auto for $99 (on special). They also had the plastic base plate for $38, which is a good deal - but I thought I would be able to get by with out one . Perhaps I will pack a piece of wood. I have to watch the budget.
We also bought a "lift mate", so we can lift the car by the wheels (nothing on the body is suitable). It cost $45 on the internet.
Here's a pic of it all being tested:

It worked well (but you need to know what you are doing, to avoid serious injury).
If a wheel is stuck in a hole, you can lift it up and pack rocks or timber under it.
If you need to remove a wheel, you can lift it up, and then put a block of wood under the axle. Then you can release the jack so you can get the wheel off.
The shelf that I am presently making in the back prevents me getting out the dinky little toy jack that came with the car, but now I have no need for it. In the workshop I use a hydraulic jack, and for out on the tracks I now have the mighty high-lift.
The pic above also shows the Ford Escape wheels, the Toyo OPAT tyres, the Iron Person side awning, the roof cage, and a bit of space under the car caused by the King springs and the larger tyres (the jack isn't increasing the space under the car by much, because it is lifting the wheel - not the body).
High lift jack
It is a good buy indeed, as you said you have to be careful with them, but they are great. As an advice, keep it in a bag to protect it from dust and other. This jack can also be used as a winch to pull you out of unwanted spot! http://www.youtube.com/watch?v=xldBPnzohtI. I would put a tarp under to stop the jack touching the ground!
Great buy,
Happy io.
Winching
Yeah Claude, everyone should have one. A nice bag was included in the price. Today I was in the shop again (Mrs Teabag was buying a solar shower) and I saw that the special deal on the high-lift jack was over. There was none left, anyway.
They can be used for winching, and may be all the winch that an iO'er needs. However you can only winch about a metre, and then you have to re-adjust your set-up so you can winch another metre...
I also have a hand winch in the car (Tirfor type). These let you winch a much greater distance in one go. I'll have to check, but I also think it is more powerful than the 1.5 tonnes of the high-lift jack. As a rule-of-thumb, they say the capacity of your winch should be twice the weight of your loaded vehicle. The specs. say that my iO weighs 1.3 tonnes empty. Loaded, it's going to be at least 1.5 tonnes, so I would need a 3 tonne winch.
I have an electric winch on the front of my mighty Mazda BT-50. Experience with this tells me that such a unit would not be suitable on an iO. It sucks hundreds of amps, so even with the engine running your battery is eventually going to go flat. After doing a successful recovery, it is a mistake to turn off your engine and take a break. You may not be able to start it again.
Optima Yellow-top Battery
Here's a pic of my Optima Yellow-top battery, and heavy-duty jumper leads:
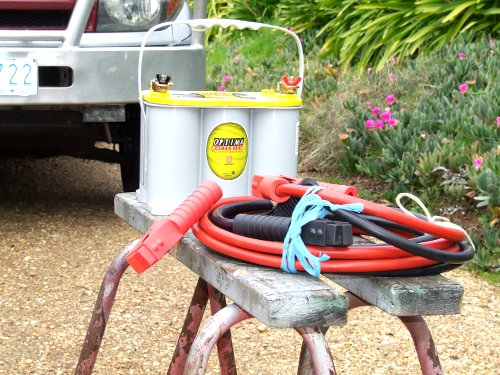
The mighty Optima battery has been selected to be able to be fitted in the usual place under the bonnet, if I should wish to one day. However this is not what I intend to do at present. It came packed in a cardboard box, and after I made sure that it was fully charged, I packed it back in it's box and placed it on the floor behind the driver's seat.
Now, if I am in a remote location, and the ordinary battery under the bonnet should give trouble, I will be able to use the Optima to jump start the car.
Actually, I am thinking of leaving the jumper leads at home. Then, if the main battery lets me down, I would have to remove it, and install the Optima in it's place. The reason for this strategy is that the vehicle is getting very heavy, and may even have exceeded it's GVM, so I would like to save some weight. Those jumper leads are quite heavy (several kilograms).
The pic above also shows a partial view of the Ford Explorer bullbar.
Rear Storage Shelf
Here is a pic of my rear storage shelf:
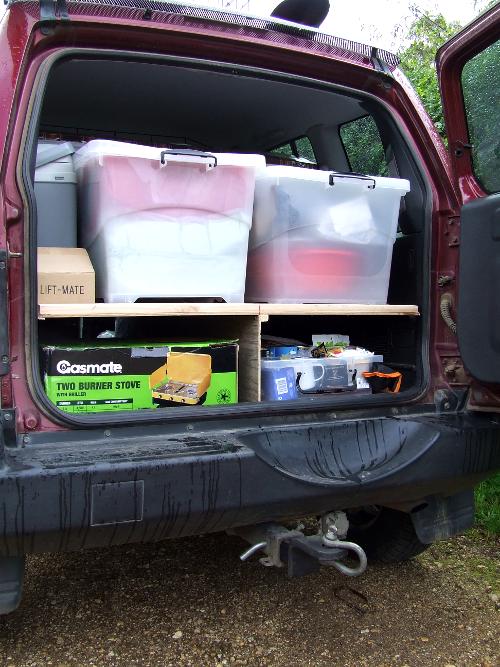
To avoid the effort of constructing drawers, I bought some plastic storage units. The one at lower right is long and skinny, and has removable dividers. This contains the food. Next to it (the black and orange thing) is the hi-lift jack in it's bag.
On the lower left side is the gas stove, and behind it is the folding camp kitchen.
On top of the shelf is the cooler-box, and the 2 large plastic tubs.
Also visible in the pic is my rear recovery point (a tow-bar with a D-shackle). I don't normally have this installed. I keep it in the car with all the other recovery gear.
For recovery from the front I have a "bridle strap" that attaches to the 2 standard tie-down points using D-shackles. This spreads the load between the 2 low-strength points, and may just be enough to effect a recovery. I have given the set-up a try-out. I placed a large rock in front of one wheel, and then tried to winch the car over it. At first, the wheel pushed the rock forward. But then the rock dug into the ground a bit and stoped sliding. After that, the winch pulled the wheel up and over the rock.
All of the weight that I have loaded into the car has reduced the rear ride height. I think it would be a good idea to fit "Poly Air" air bags inside the rear coil springs. With these fitted, you can adjust the ride height by just pumping more air into the air bags (or letting some out).
I have removed some weight by taking out some stuff that I probably won't use. I took out the drag chain. These are handy for dragging fallen trees off of the track. However, they are quite heavy. I also took out the snatch block. These are handy for multiplying the force of your winch. However, the cable on the hand winch that I have in the Pajero iO is much thicker than that on the Aldi electric winch on my Mazda BT-50. I don't think that it would be a good idea to expect the large diameter winch cable to bend around the pulley of the snatch block.

hey mate thats a nice storage
hey mate thats a nice storage solution you have there. i have built a shelf in the back of my 3 dr so i can stow away my firefighting gear underneath and any of my sports gear on top.
it has some offcuts of our floor carpet that we have in the house liquid nailed on top for a bit more aesthetic pleasure rather than just wood. it also helps so thtat anything that sits on top doesnt slide around when cornering
how did you build yours? ive built mine so that in bolts down onto the plastic "humps" at the rear just above the wheel arches. mine is 19mm pine with two square steel tubes running the width of the shelf for support. there is no centre brace like you have in yours. maybe i should have done it that way. thoughts???
also do you have to fold the reaer seats for all that storage? i know you have a 5dr and the "boot" is bigger. but is it really that much bigger?
how deep is it? from the bottom of the rear to the rear seats? mine is like only 30cm or thereabouts
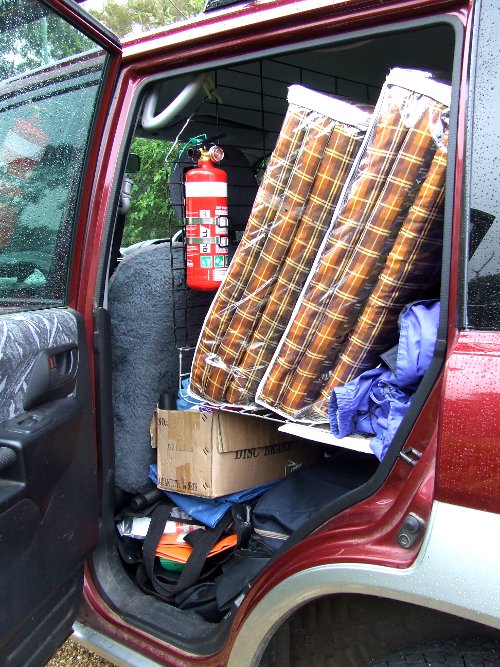
Fire Extinguisher & Cargo Barrier
This pic (below) shows my fire extinguisher mounted on the back of my cargo barrier.
Daniel, your shelf setup sounds more refined than mine. I removed the back seat (since there is just Mrs Teabag and myself). However, in between trips we intend to put the seat back in. So, I don't know the distance from the back door to the back seat, because the back seat is not there.
I did not want to drill any new holes in the car. The shelf is made of plywood, and I think it is about 6 mm thick. I made a template, and then I cut out the ply (2nd hand) to fit on top of those back wheel-arch humps. The ply is reinforced by several lengths of 20mm x 20mm wood. These are on top of the ply (screwed on), and also serve to locate the plastic tubs so they don't slide around.
The cargo barrier is steel mesh. It is not as heavy duty as a bought one, but I am sure that it would stop a flying can of baked beans. The barrier is mounted immediately behind the front seats, and has an "L" shape so that it joins up with the rear shelf. The space underneath (where rear-seat passengers' feet would go) is mostly full of recovery gear, tools, and spare parts.
The central support is essential to support the shelf (beacuse it is "light duty"). However, it also provides useful separation of the items under the shelf. The central support is bolted in place in one location. That's near the front, where it is attached by one of the bolts that usually hold the seat in place.
In the pic, the mighty Ironman full recovery kit can be seen (with a couple of items left at home, to save weight). Underneath is the also mighty Maxi Trak hand winch. The winch came in a nice zippered bag. The cable for the winch has it's own nice zippered bag, and this is located on the floor on the other side.
I have not painted any of my handiwork, and I am not saying that I am ever gunna do it. However, I do have a can of satin black paint, so you never know what might happen the next time the whole thing is out of the car.
I have been using 30PSI of pressure in the mighty Toyo all-terrain tyres (a figure that Mrs. Teabag picked). The 26PSI that Mitsubishi recommended for the original tyres was obviously too low in this case. Since all the weight has been packed into the car, I think I will increase the pressure in the rear ones to 32PSI. In the Bridgestone highway tyres that we have on our original alloy wheels, we have been using 36PSI (if the pressure is less than 34PSI, they look "flat").
Bullbar
The pic of my car (at the bottom) shows the Ford Explorer bullbar (in part). The air intake behind the number plate has been enlarged (by me). Most of it is blocked by the number plate, so I thought I needed to let more air in. Also, these bullbars have an angled shape to the end of the air intake, but I prefer the shape that I have made it. The main bumper section of the bar has the ends angled back, but not enough to match the shape of the front of the car. I did a lot of cutting (to the bar), to make it sit back as close to the car as possible. Before I did this, it would have been possible to fit a winch inside the bar, but probably not now.
If I had been going to fit an electric winch, here's what I think I would have done: I would have picked a size of winch that is appropriate for a small vehicle. Something like 3000kg capacity, with synthetic rope for lightness. I would have used one of those winch mounting trays, like Tigerz11 sell. Except that theirs is quite big and heavy, but it could be suitable if it was cut down. This would be secured to the front crossmember, and extend forward horizontally. The winch sits on this, and is installed before the bullbar goes on. The winch tray that you buy is pre-drilled for the winch (but some other holes would probably have to be drilled for a small winch. The front edge of the tray is folded upwards horizontally, and is drilled and slotted to mount the fairlead, or hawse. This also helps to mount the bullbar (it goes against the front of the winch tray, before the hawse, and then the bolts go through the lot.
The reason that I didn't do this is that I didn't want to add the weight to the front of my car, and an electric winch draws a lot of current out of your little battery, and your little alternator.
Here's a suitable winch, it weighs 21 KG, and costs $500: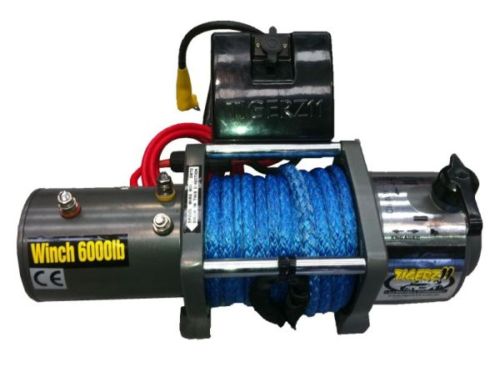
Here's a winch mounting tray, it costs $89: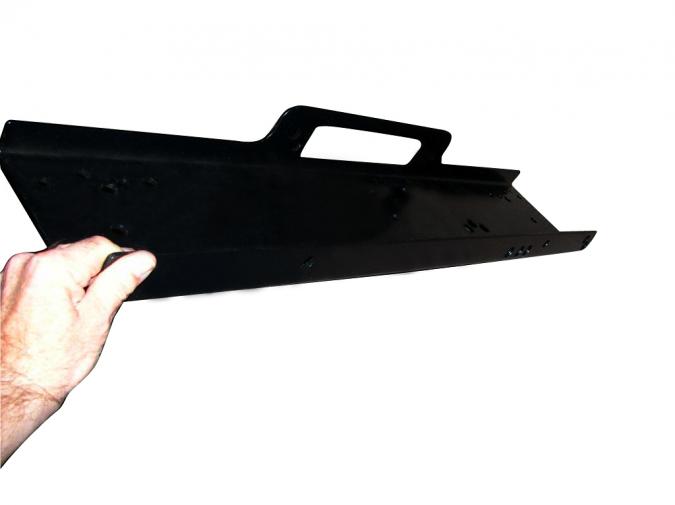
.
What steel wheels do you have, and what bullbar? Both as are interesting topics for IO owners.
Also, high five if your last name really is teabag....